The Command System
This article explains how MonoDevelop’s Command System works, and how can you take advantage of it for writing your add-ins.
Basic Concepts
There are two concepts that must be very clear to understand how MonoDevelop’s command system works:
- There is a clear separation between command definitions (a list of the commands that the IDE supports), and the menus and toolbars that allow you to access to those commands. Commands definitions and menus/toolbars are defined separately.
- The action to execute when a command is invoked depends on the context in which is it invoked. For example, the command Delete will delete the selected text if we are working in the text editor, or will delete the selected project file if we have the focus on the project tree. And it’s the same Delete command.
Comand Definitions
Comands are defined by adding entries to the “/MonoDevelop/Ide/Commands” extension point. A command definition looks like this:
<Command id = "MonoDevelop.Ide.Commands.ProjectCommands.Run"
    defaultHandler = "MonoDevelop.Ide.Commands.RunHandler"
    icon = "gtk-execute"
    shortcut = "F5"
    description = "Run"
    _label = "Run" />
where:
- id identifies the command. IMPORTANT: This id must correspond to the full name (including namespace) of an existing enumeration member. This enum will be used later to identify command handlers.
- defaultHandler is the handler class to execute if there isn’t any other handler in the current context (more on this later) (it’s optional).
- icon is the stock icon to shown in menus and toolbars.
- _label is the text to be shown in menus.
- description is shown as a tooltip for toolbar buttons (optional).
- shortcut is the key combination that invokes the command (optional).
In adition to “normal” commands (those which just execute an action when invoked) there are other three types of commands, described below. The type of a command is specified using the “type” attribute.
Toggle commands
Those are commands which show a toggle status next to the menu text, or that are shown activated or deactivated in the toolbar. Such a command can be defined setting the type to check, like in this example:
<Command id = "MonoDevelop.Ide.Commands.ProjectCommands.IncludeInBuild"
  type = "check"
 _label = "Build" />
If you have several toggle commands which are mutually exclusive, you can use the radio type, which behaves in the same way, but shows a radio button instead of a check in the menu option.
Custom commands
Custom commands can be used to display custom command widgets in menus and toolbars. You must set the type attribute to custom, and the class of the widget to be created must be specified in the widget attribute. For example:
<Command id = "MonoDevelop.Ide.Commands.ProjectCommands.ConfigurationSelector"
    type = "custom"
    widget = "MonoDevelop.Ide.Gui.ConfigurationComboBox"
    _label = "Active Configuration" />
Command Arrays
Command arrays can be used to implement selection lists in menus. For example, they are used by the IDE to show the list of open windows:
<Command id = "MonoDevelop.Ide.Commands.WindowCommands.OpenWindowList"
    defaultHandler = "MonoDevelop.Ide.Commands.OpenWindowListHandler"
    type="radio|array"
    _label = "Window List" />
Notice that the array’ type can be used in combination with check to show a list of options which are all selectable, or radio if the options are mutually exclusive.
Generally speaking, command arrays can be used to dynamically generate command entries in a menu or toolbar. This is another example:
<Command id = "MonoDevelop.Ide.Commands.FileCommands.RecentFileList"
     defaultHandler = "MonoDevelop.Ide.Commands.RecentFileListHandler"
     type="array"
     _label = "Recent Files" />
Menus and Toolbars
Menus and toolbars are both defined in the same way. The IDE provides several extension points which define the main menu, the main toolbar, and all the contextual menus used everywhere. This is how a menu/toolbar definition looks like:
<Extension path = "/MonoDevelop/Ide/ContextMenu/ProjectPad/ProjectFile">
    <CommandItem id = "MonoDevelop.Ide.Commands.ViewCommands.Open" />
    <SeparatorItem id = "OpenSeparator" />
    <ItemSet id = "Add" _label = "Add">
         <CommandItem id = "MonoDevelop.Ide.Commands.ProjectCommands.AddNewFiles" />
         <CommandItem id = "MonoDevelop.Ide.Commands.ProjectCommands.AddFiles" />
         <SeparatorItem id = "Separator1" />
         <CommandItem id = "MonoDevelop.Ide.Commands.ProjectCommands.NewFolder" />
    </ItemSet>
    <SeparatorItem id = "IncludeSeparator" />
    <CommandItem id = "MonoDevelop.Ide.Commands.EditCommands.Copy" />
    <CommandItem id = "MonoDevelop.Ide.Commands.EditCommands.Cut" />
    <SeparatorItem id = "CutSeparator" />
    <CommandItem id = "MonoDevelop.Ide.Commands.EditCommands.Delete" />
    <CommandItem id = "MonoDevelop.Ide.Commands.EditCommands.Rename" />
</Extension>
Several types of items can be used to define menus and entries. They are described below.
CommandItem
Creates an item that will invoke the command identified by the id attribute. If the command is actually a command array, it will create an item for each element in the command array.
SeparatorItem
Nothing else to explain.
ItemSet
Creates a submenu of items. It takes two attributes (in addition to id):
- _label: The text to show in the item.
- icon: The icon for the submenu.
ItemSet can also be used in toolbars, in which case a drop-down menu is created.
LinkItem
Creates a menu or toolbar entry that opens a web page in the default web browser. For example:
<LinkItem id = "MonoDevelop" _label = "MonoDevelop" link = "http://www.monodevelop.com" />
Handling Commands
Remember: “The action to execute when a command is invoked depends on the context in which is it invoked”.
OK, but what is a context? Basically, the context is the widget that has the focus. When the focus changes, the context changes, and the set of commands that are available and enabled, and even the behavior of those commands may change. Makes sense?
Does this mean that you need to define command handlers for every widget that can have the focus? Not at all (although you can if you want). Every widget has an inherent command dispatch route. When a command is invoked, if the widget that has the focus does not have a handler for the command, it will forward the command to the next object in the command route, which is (by default) the parent of the widget.
The following diagram shows an example of command routes:
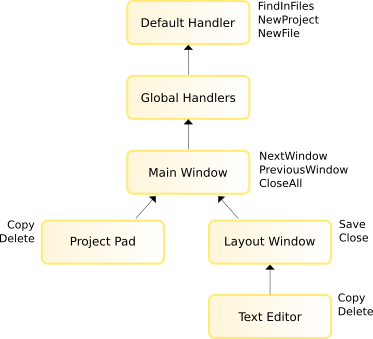
Two interesting things:
- The diagram shows two command routes: one for the text editor and another one for the Project pad. As you can see, they share half of the route.
- You can define command handlers in any level of the command route. The command names next to the boxes represent command handlers.
- The Delete command is handled both in the Project Pad and the Text Editor. Depending on which one has the focus, one or the other handler will be executed.
By default, command routes follow this sequence:
- widget that has the focus
- parent of the widget, until the root widget is reached
- global command handlers: registered using Ide.CommandService.RegisterGlobalHandler (object).
- command’s default handler: specified in the defaultHandler attribute of the command definition.
Implementing command handlers
To handle a command in any of the objects in the command route you only need to add the handler method to the class and apply the CommandHandlerAttribute. For example:
[CommandHandler (FileCommands.Save)]
protected void OnSaveFile ()
{
     // Do the save
}
FileCommands.Save is the enum value that identifies the command (remember that when we define a command, it’s id must match an existing enum member).
Managing Command Status
Start MonoDevelop and open a file. You’ll see that the Save button is disabled. Now click on the editor and type some text. The Save is enabled. Now click on the Task List. The Save button is disabled again. How is the command status handled?
The first thing to be aware of is that the command system will automatically disable commands for which there isn’t a command handler in the active command route. That’s what happens when you change the focus from the editor to the Task List (which has no Save command handler).
If the status of the command depends on some internal logic of the application, you can add this logic in a special Command Update Handler:
[CommandUpdateHandler (FileCommands.Save)]
protected void OnUpdateSaveFile (CommandInfo info)
{
    IViewContent content = window.ActiveViewContent as IViewContent;
    info.Enabled = content.IsDirty;
}
This handler will be called by the command system when it needs to know the status of the command. For menu commands, this is done when the menu is displayed. For toolbar commands this is done at a specific time frequency.
To know which update handler to execute, the Command System follows the same command route that will be used for executing the command. So you usually write the command update handler next to the command execution handler.
In the command update handler you can use the CommandInfo object to change the Enabled status of the object. But not only this, you can change all properties of a command: the text, the icon, the description or the visibility.
Command update handler can also be used to set the Active status of toggle commands. You only need to set the Checked property of CommandInfo.
Array command handlers
Array commands need some special handlers, since a single command may result in multiple menu items. The collection of items for a command array is generated in its update handler. For example:
[CommandUpdateHandler (WindowCommands.WindowList)]
protected void UpdateWindowList (CommandArrayInfo info)
{
     foreach (Window w in ListOfWindows)
          info.Add (w.Title, w);
}
This will create a list of menu items using the window title as text. The seconds parameter of the Add method is an arbitrary object that will be provided to the command handler:
[CommandHandler (WindowCommands.WindowList)]
protected void UpdateWindowList (object data)
{
     ((Window)data).Select ();
}
CommandArrayInfo is in fact a collection of CommandInfo objects. The Add method used in the example is just a convenient overload. You can add CommandInfo to the collection and set any property you want (text, icon, enable status, etc).
The default command handler
Commands may have a default handler, which is the last object in all command dispatch routes. The default handler is specified in the command definition using the defaultHandler attribute, like in this example:
<Command id = "MonoDevelop.Ide.Commands.ProjectCommands.Run"
    defaultHandler = "MonoDevelop.Ide.Commands.RunHandler"
    icon = "gtk-execute"
    shortcut = "F5"
    description = "Run"
    _label = "Run" />
The value of the defaultHandler attribute must be the fully qualified name of a class that inherits from CommandHandler. The CommandHandler class has several overridable methods. The following two are for handling and updating normal commands:
void Run ()
void Update (CommandInfo info)
And these are for command arrays:
void Run (object dataItem)
void Update (CommandArrayInfo info)
Startup Extension Path
It is possible to write special CommandHandlers that will be run during MonoDevelop startup. You need to do two things.
First you must add your class e.g. MyHandler to the startup extension point. Edit the MonoDevelop.Ide.addin.xml file adding your handler like this:
<Extension path = "/MonoDevelop/Ide/StartupHandlers">
  <Class class = "MyHandler"/>
</Extension>
Next all you have to do is write your CommandHandler to perform whatever you want MonoDevelop to do at startup:
class MyHandler: CommandHandler
{
  protected override void Run ()
  {
    Console.Out.WriteLine("Hello World!");
  }
}
That’s it.
Advanved Features
Creating contextual menus
TODO
Changing the command dispatch route
TODO