Creating ASP.NET Projects
Introduction
This tutorial outlines the process of creating, running and publishing an ASP.NET application with MonoDevelop.
Creating the Solution
After opening MonoDevelop, select New Project from the Welcome Page or the File menu, to bring up the New Solution dialogue. From the list of project types on the left expand the C# category to reveal the ASP.NET subcategory, and select it. Now select the “Web Application” project, and specify the name and location of the new project, as shown below.
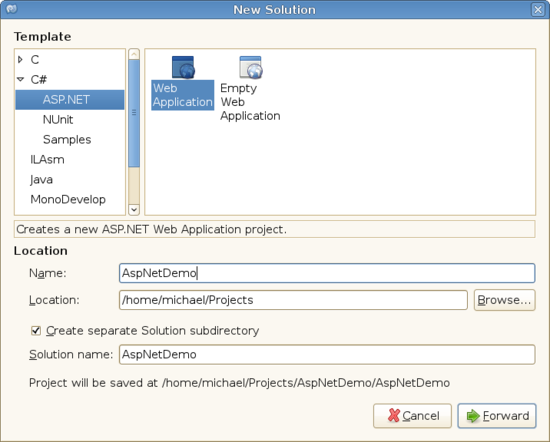
ASP.NET projects are similarly available for other languages, but may not be fully supported.
Click on Forward, and you will be presented with some additional features that can be added to your Solution, such as packaging and translation. These features can be added later, and are only shown at this point for your convenience. Click Ok to complete the creation of the Solution.
Building and Running the Application
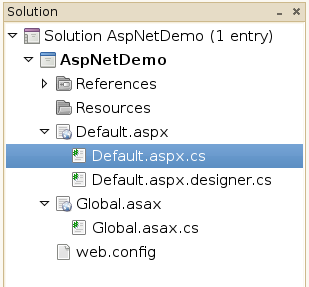
The new project contains a default set of files. There’s a page called Default.aspx, and grouped with it are its C# CodeBehind files Default.aspx.cs and Default.aspx.designer.cs. There’s a Global.asax file for global application code, with CodeBehind in Global.asax.cs, and there’s a Web.config file for application settings.
Edit the Default.aspx file, and between the form tags, add an ASP button and label:
<form id="form1" runat="server">
    <asp:button id="clickMeButton" runat="server" text="Click Me" />
    <asp:label id="outputlabel" runat="server" />
</form>
Now run the application using the Run command in the toolbar or the Project menu, or by hitting F5. This compiles your application, runs it using Mono’s xsp web server, and after a short delay loads it up in your default web browser. You can click the button that says “Click Me”, and watch it post back to the server, but it doesn’t do anything yet. Note that there ‘s also a Stop command to end your applicatio’s execution, and commands to build individual projects or solutions without running them.
Adding some CodeBehind
We’re developing this application with CodeBehind, because it’s a cleaner development model than writing your C# code in the .aspx file. If you look at the Default.aspx page, you’ll see that in the Page directive at the top it species that the page inherits from the AspNetDemo.Default class, which subclasses System.Web.UI.Page. By putting code in here (or any intermediate subclasses) we can keep it separate from the page structure.
The AspNetDemo.Default class is split between the partial classes in Default.aspx.cs and Default.aspx.designer.cs. The designer partial class contains code that’s autogenerated by MonoDevelop. If you take a look in it you’ll see that during the compile, MonoDevelop added members for the button and label that we added to the Default.aspx file. These provide a way for you to access the web controls from the CodeBehind. You should avoid editing the designer file, as your changes could be overwritten.
Open the Default.aspx file, and add an onClick attribute to your button. This specifies the name of a method that will be run when the button is clicked. There are a number of events that can be hooked upt to all ASP.NET controls in a similar way.
<asp:button id="clickMeButton" runat="server" text="Click Me" onClick="clickMeButton_Click" />
Next open the Default.aspx.cs file, and to the Default class add the following method
public void clickMeButton_Click (object sender, EventArgs e)
{
    object val = ViewState["ButtonClickCount"];
    int i = (val == null)? 1 : (int)val + 1;
    outputlabel.Text = string.Format ("You clicked me {0} {1}", i, i==1?"time":"times");
    ViewState["ButtonClickCount"] = i;
}
This is storing the current click count in the untyped ViewState collection property of the base System.Web.UI.Page class. ViewState is ASP.NET Web Forms’ mechanism for storing controls’s state between page postbacks and circumventing the stateless nature of the HTTP protocol. Note that we can access the outputLabel control because MonoDevelop defined it in the Default.aspx.designer.cs class, and due to this, MonoDevelop is able to provide code completion.
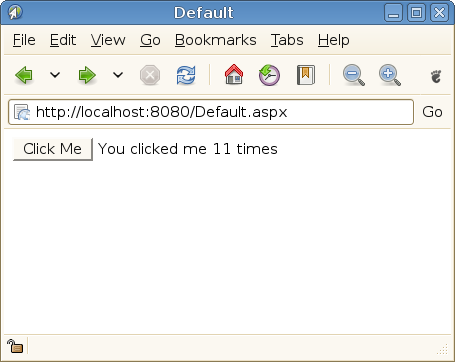
Run the page, and clicking the button will now produce some feedback, by updating the label with the number of times you’ve clicked it.
Deploying the Project
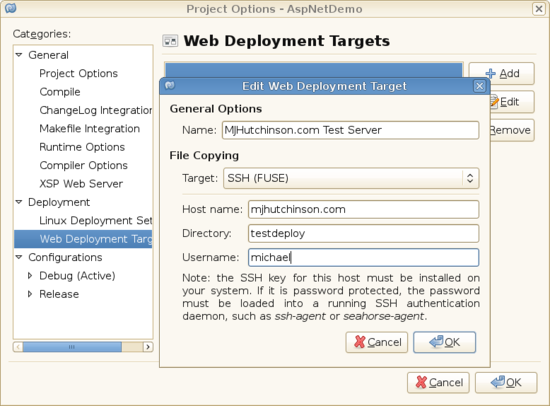
In the Project Options, the Web Deployment Targets panel allows you to define deployment targets, local or remote directories to which the application can be deployed. Remote deployment requires the sshfs FUSE filesystem.
After targets have been configured, the project can be deployed using the Project->Deploy to Web… command in the main menu, or by right-clicking on the project and selecting Tools->Deploy to Web….
Additional Tips
- You can change the Mono runtime profile (1.1/2.0) that’s used to build and run the project in the Project Options, accessible by right-clicking on the project in the Solution Pad. The option is in the Runtime Options panel.
- A variety of options are available for configuring the xsp web server. These are also found in Project Options, in the XSP Options panel.
- Mono’s C# compiler for the 1.1 profile supports partial classes, unlike the .NET 1.1 C# compiler.
- MonoDevelop automatically adds and removes entries in your web.config corresponding to your referenced libraries.