How to extend the Project Model
Introduction
MonoDevelop has an extensible project model, designed to make it possible for add-ins to easily implement and integrate new features into the model.
There are many ways of extending the model, and every add-in should find the way that better fits its needs. Here are some examples of things an add-in can do:
- Add support for a .NET language (for example, the Boo add-in).
- Add support for a non .NET language (a C add-in).
- Create a new solution item (for example, a database project).
- Add new properties to existing types (for example, add Gtk# design information to projects).
This article explain how can you do all this.
Overview of the Project Model
The following UML diagram is a simplified view of the project model:
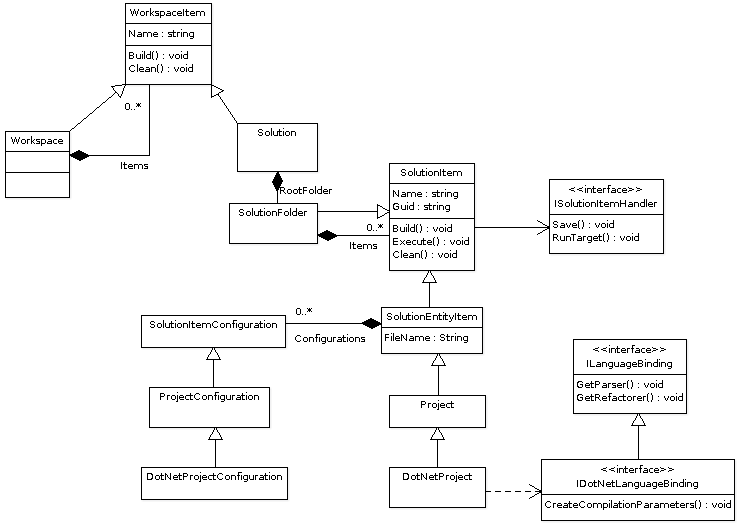
Here is some info about the classes in the diagram:
- Solution: a group of projects and other solution items.
- SolutionItem: the base class of anything that can be added to a solution.
- SolutionEntityItem: a special type of solution item which is stored in its own file.
- Project: a set of files that are usualy compiled together to generate a binary output.
- DotNetProject: a type of project specialized in building and executing .NET assemblies.
- SolutionItemConfiguration: a class that keeps common configuration properties for a solution item. Each SolutionItem subclass may have also subclasses of SolutionItemConfiguration, such as ProjectConfiguration or DotNetProjectConfiguration.
- ILanguageBinding is an interface that needs to be implemented to support code completion and refactoring services in new languages.
- IDotNetLanguageBinding is an interface that needs to be implemented to support compilation of new .NET languages.
- Workspace: a set of solutions (or other workspace items)
- WorkspaceItem: the base class of anything that can be added to a workspace.
Adding support non .NET languages
MonoDevelop is not limited to .NET languages, it can support any type of language. This is what you need to do to support a new language:
Create a Project subclass
You need to create a Project subclass and implement several virtual methods it provides, such as: Build(), DoExecute(), or GetOutputFileName().
Implement IProjectBinding
You also need to implement the IProjectBinding interface. The Name property identifies the new project type, and it is the name used in project templates to refer to this project type.
If you want to support single file compilation (that is, be able to compile and run a source code file without having to create a project), you can implement CreateSingleFileProject and CanCreateSingleFileProject. Just return null if you don’t want to support it.
The project binding must be registered in an extension point, for example:
<Extension path = "/MonoDevelop/ProjectModel/ProjectBindings">
    <ProjectBinding id = "MyProject" class = "MyAddin.MyProjectType" />
</Extension>
Optional: Implement ILanguageBinding
ILanguageBinding can be implemented to support additional language features such as code completion or refactoring. New language binding types must be registered like this:
<Extension path = "/MonoDevelop/ProjectModel/LanguageBindings">
    <LanguageBinding id = "MyLanguage"
                     supportedextensions = ".ml"
                     class = "MyAddin.MyLanguageBinding" />
</Extension>
Create a project template
Projects are created by users using the project templates available in the New Project dialog. So in general add-ins that implement new project types should also provide project templates for those.
When creating a project template, the project type (that is, the Name of the project binding, not the name of the class) can be specified by adding the type attribute to the Project element. For example:
<Template>
    <TemplateConfiguration>
        <_Name>Custom Project</_Name>
        <Category>Custom</Category>
        <Icon>res:MyProjectIcon</Icon>
        <_Description>Creates a new custom project.</_Description>
    </TemplateConfiguration>

    <!-- Actions -->
    <Actions>
        ...
    </Actions>

    <!-- Template Content -->
    <Solution name = "${ProjectName}" directory = ".">
        <Options>
            <StartupProject>${ProjectName}</StartupProject>
        </Options>

        <Project name = "${ProjectName}" directory = "." type="MyProject">
            <Options/>
            <Files>
                ...
            </Files>
        </Project>
    </Solution>
</Template>
Adding support for new .NET languages
To support a new .NET language it should be enough to provide an implementation of IDotNetLanguageBinding. .NET languages have in common that they generate assemblies, and that all those assemlies can be executed in the same way. The class DotNetProject handles all this. What’s specific is how the assemblies are generated, and that’s what IDotNetLanguageBinding provides. So this is what you need to do:
Implement IDotNetLanguageBinding
The Compile() method should compile the source code and generate an assembly. If there are some compiler specific options you want to make available, implement the CreateCompilationParameters method.
IDotNetLanguageBinding inherits from ILanguageBinding, so you can also provide support for code completion or refactoring by implementing the Parser and Refactorer properties. See “Implement ILanguageBinding” in the previous chapter for more info.
IDotNetLanguageBinding implementations must be registered as regular language bindings, that is:
<Extension path = "/MonoDevelop/ProjectModel/LanguageBindings">
    <LanguageBinding id = "MyLanguage"
                     supportedextensions = ".ml"
                     class = "MyAddin.MyLanguageBinding" />
</Extension>
Create a project template 2
Project templates can be created and registered like the non .NET language templates (see previous chapter), with some particularities:
- The project type don’t need to be specified, since it is DotNet by default.
- The language name can be specified in a <Language> element in the <TemplateConfiguration> element of the template. The language can also be specified per project by setting the language attribute of the <Options> element of the project.
Creating new types of solution items
A solution can contain objects which are not solutions or projects, but arbitrary sets of information. For example, the NUnit add-in defines a new type of SolutionItem which is a set of assemblies to be tested. This is what you need to do:
Create a subclass of SolutionItem or SolutionEntityItem
There are several abstract methods you need to implement: Clean, Build, Execute and NeedsBuilding. Other virtual methods already provide a fully working implementation and their reimplementation is optional.
If the new solution item needs to store information in its own project file, the best option is to subclass SolutionEntityItem. When saving the solution, MonoDevelop will create a project file specific for that item and will store all its information there. For solution items subclassing SolutionItem instead of SolutionEntityItem, the item’s information is stored in the solution file.
Create a project template 3
The <SolutionItem> element can be used to declare an arbitrary solution element. Use the type attribute to specify the fully qualified name of the class. For example:
<Template>
    <!-- Template Header -->
    <TemplateConfiguration>
        <_Name>NUnit assembly test collection</_Name>
        <Category>NUnit</Category>
        <_Description>Create an NUnit assembly test collection</_Description>
    </TemplateConfiguration>

    <!-- Template Content -->
    <Solution name = "${ProjectName}" directory = ".">
        <Options>
            <StartupProject>${ProjectName}</StartupProject>
        </Options>

        <SolutionItem name = "${ProjectName}" directory = "." type = "MonoDevelop.NUnit.NUnitAssemblyGroupProject, MonoDevelop.NUnit">
        </SolutionItem>
    </Solution>
</Template>
Adding custom properties to existing projects or solution types
Any existing SolutionItem or WorkspaceItem subclass (including Project and Solution) can be extended with new properties.
Use the ExtendedProperties dictionary to get and set custom property values. Here is an example:
Project project = ...;
project.ExtendedProperties ["MyAddin.MyPropertyName"] = "hello!";
...
string storedValue = (string) project.ExtendedProperties ["MyAddin.MyPropertyName"];
Notice that those custom properties will not be stored to the project file when saving the project. If you want the properties to be stored in the file, you have to register them in the project model:
<Extension path = "/MonoDevelop/ProjectModel/ExtendedProperties">
    <ItemProperty class = "MonoDevelop.Projects.Project"
                  name = "MyAddin.MyPropertyName"
                  type = "System.String" />
</Extension>
It is recomended to use the add-in namespace as prefix of the name, to avoid name colisions. You are not limited to using primitive types in new properties. In fact, if an add-in is going to need many additional properties, it’s better to create a class with all needed info and declare just one property using that class as type.
Project service extensions
Using Project Service Extensions add-ins can hook on the project service and change the behavior of some common project and solution operations. A project service extension can be created by implementing a subclass of ProjectServiceExtension. This class is defined in the MonoDevelop.Projects namespace and looks like this:
public class ProjectServiceExtension
{
    // Called when a solution item is saved
    public virtual void Save (IProgressMonitor monitor, SolutionEntityItem entry) {...}

    // Called to check if a file is a solution item which can be loaded by the Load method
    public virtual bool IsSolutionItemFile (string fileName) {...}

    // Called to load a solution item
    public virtual SolutionEntityItem LoadSolutionItem (IProgressMonitor monitor, string fileName, ItemLoadCallback callback) {...}

    // Called to clean the solution item
    public virtual void Clean (IProgressMonitor monitor, SolutionEntityItem entry, string configuration) {...}

    // Called to build the solution item
    public virtual BuildResult Build (IProgressMonitor monitor, SolutionEntityItem entry, string configuration) {...}

    // Called to execute the solution item
    public virtual void Execute (IProgressMonitor monitor, SolutionEntityItem entry, ExecutionContext context, string configuration) {...}

    // Called to check if the solution item needs to be built (if it depends files that have been modified)
    public virtual bool GetNeedsBuilding (SolutionEntityItem item, string configuration) {...}

    // Called to set the build flag
    public virtual void SetNeedsBuilding (SolutionEntityItem item, bool val, string configuration) {...}

    // Called to get all files that should be copied when exporting the solution item to a new location
    public virtual List<string> GetItemFiles (SolutionEntityItem item, bool includeReferencedFiles) {...}
}
There are many other methods which can be overriden to provide a custom behavior for solutions and solution items. Here is an example of what an add-in could do:
public class MyExtension: ProjectServiceExtension
{
    public override ICompilerResult Build (IProgressMonitor monitor, SolutionEntityItem item, string configuration)
    {
        Console.WriteLine ("Do something before the build");
        base.Build (monitor, item, onfiguration);
        Console.WriteLine ("Do something after the build");
    }
}
In this example the extension is calling base.Build() because it doesn’t want to completely replace the Build method, it only wants to run some custom code before and after the build.
Project service extensions must be registered in the “/MonoDevelop/ProjectModel/ProjectServiceExtensions” extension point. For example:
<Extension path = "/MonoDevelop/ProjectModel/ProjectServiceExtensions">
    <Class class="MyAddin.MyExtension"/>
</Extension>
Custom File Formats
MonoDevelop has a pluggable file format system which allows defining multiple file formats for projects and solutions. A file format is an implementation of the IFileFormat interface, which has methods for identifying, loading and saving a solution and/or a solution item. The project and combine classes are decoupled from the read/write code. Everything is done in IFileFormat implementations (the “native” MD file format is just another IFileFormat implementation).
IFileFormat is defined in the MonoDevelop.Projects namespace and looks like this:
public interface IFileFormat
{
    // Returns a valid file name for the provided object and file (e.g. it might change
    // the extension to .csproj for the VS2005 format)
    FilePath GetValidFormatName (object obj, FilePath fileName);

    // Returns true if this file format can read the provided file to load an
    // object of the specified type
    bool CanReadFile (FilePath file, Type expectedObjectType);

    // Returns true if this file format can write the provided object
    bool CanWriteFile (object obj);

    // Writes an object
    void WriteFile (FilePath file, object obj, IProgressMonitor monitor);

    // Reads an object
    object ReadFile (FilePath file, Type expectedType, IProgressMonitor monitor);

    // Returns the list of files where the object is stored
    List<FilePath> GetItemFiles (object obj);

    // Return true if the file formats supports mixing items of different formats.
    // For example, solutions using the MonoDevelop 1.0 file format can contain
    // projects stored using the MSBuild file format.
    bool SupportsMixedFormats { get; }

    // Returns a list of warnings or errors to show to the user about compatibility issues
    // that may arise when exporting the object to this format.
    IEnumerable<string> GetCompatibilityWarnings (object obj);

    // Makes the required changes in the object to support this file format.
    // It usually means setting the ISolutionItemHandler of the item.
    void ConvertToFormat (object obj);

}
MonoDevelop supports multiple file formats for the same kind of combine entry (project, solution or whatever). You only need to register it in the “/MonoDevelop/ProjectModel/FileFormats” extension point. For example:
<Extension path = "/MonoDevelop/ProjectModel/FileFormats">
    <FileFormat id="MSBuildFileFormat" class="MonoDevelop.Prj2Make.MSBuildFileFormat"/>
</Extension>
The default file format
MonoDevelop has a default IFileFormat implementation that will be used when none of the registered file formats can handle a given object type. This default file format uses the serialization engine to serialize the object to a file, and will use “.mdse” as file extension.
It means that if you are creating a new subclass of SolutionEntityItem you are not forced also to implement a IFileFormat class. By default, the .mdse file format will be used.
Adding serialization support
MonoDevelop has a serialization engine which is used to save and load solutions and projects from files. Like in the system XML serializer, the process of serialization can be controlled by applying some attributes to fields and properties.
Serialization attributes
Here is a description of the attributes you can use:
- ItemPropertyAttribute: This attribute has to be applied to the fields or properties that have to be serialized. Notice that only fields or properties with this attribute are serialized (this is different from XmlSerializer, where all public members are serialized by default). ItemPropertyAttribute has several properties (all of them optional) that can be set to change the default serialization behavior:
- Name: Name of the property in the serialized model. It’s the member name by default. You can specify a nested element name. For example, the name “Data/Name” will create the property as a child of the Data element, and it will be named “Name”.
- DefaultValue: Default value of the member. A property won’t be serialized if the assigned value is the default value.
- ReadOnly: true if the member will be read but never written.
- WriteOnly: true if the member will be written but never read.
- Scope: When added to a collection or array member, it specifies the nesting level to which the ItemPropertyAttribute applies. 0 is the member itself, 1 is the first level of collection elements, and so on.
- ValueType: Specifies the type to use for serialization, if the one declared in the member is too generic.
- DataItemAttribute: This attribute can be used to set the name of the type in the serialized model. By default it’s the name of the class. This attribute is optional.
- DataIncludeAttribute: All types involved in an object tree must be know in advance by the serializer, or it won’t be able to serialize or deserialize the tree. This attribute can be applied to classes or members to include types in the serialization model. This is only needed for types not explicitely declared in members.
- ExpandedCollectionAttribute: When applied to an array or collection attribute, the collection contents will be serialized as children of the container object, that is, there won’t be a root collection element.
Here are some examples:
// This class will be serialized using "SomeTest" as root element.
[DataItem ("SomeTest")]
public class SerializationTest
{
    // This field won't be serialized
    int someInt;

    // This field will be serialized
    [ItemProperty]
    string someString;

    // This field will be serialized, but only if it's not empty.
    [ItemProperty (DefaultValue="")]
    string someDefaultString;

    // This field will be serialized as a child element of "Data"
    [ItemProperty ("Data/Info")]
    string someInfo;

    // This property will be serialized as an array of strings.
    // The element name will be "Names" (instead of "names"),
    // and there will be a "Name" element for each item of the list.
    [ItemProperty ("Names")]
    [ItemProperty ("Name", Scope=1, ValueType=typeof(string))]
    ArrayList names;

    // This property will be serialized as a set of Value elements
    // There won't be a "values" root element.
    [ItemProperty ("Value")]
    [ExpandedCollection]
    string[] values;
}
Here is some sample XML which could have been generated from the previous class:
<SomeTest>
    <someString>Hi</someString>
    <Data>
        <Info>some info</Info>
    </Data>
    <Names>
        <Name>One</Name>
        <Name>Two</Name>
        <Name>Three</Name>
    </Names>
    <Value>First</Value>
    <Value>Second</Value>
</SomeTest>
Custom serialization
Types with complex serialization needs which can’t be specified using attributes can implement ICustomDataItem to provide a custom serialization behavior. ICustomDataItem defines two methods:
- Serialize: This method has to serialize the contents of the object into a DataCollection. It provides as input parameter an ITypeSerializer instance which you can use to run the default serializer.
- Deserialize: It has to deserialize the provided DataCollection and fill the object with data. An ITypeSerializer is also provided.
Here is an example:
public class WindowData: ICustomDataItem
{
    [ItemProperty]
    string id;

    [ItemProperty]
    string title;

    int width;
    int height;

    DataCollection ICustomDataItem.Serialize (ITypeSerializer serializer)
    {
        // Use the provided serializer to run the default serialization.
        // This is optional, but it's useful if you just want to
        // tweak the default behavior, not completely reimplement it.
        DataCollection data = serializer.Serialize (this);

        // Now add some custom data
        data.Add (new DataValue ("size", width + " " + height));
        return data;
    }

    void ICustomDataItem.Deserialize (ITypeSerializer serializer, DataCollection data)
    {
        // Extract the custom value we added in the Serialize method
        DataValue size = data.Extract ("size") as DataValue;
        string[] sizes = size.Value.Split (' ');
        width = int.Parse (sizes[0]);
        height = int.Parse (sizes[1]);

        // Deserialize the other fields.
        serializer.Deserialize (this, data);
    }
}
Creating configuration dialog panels
After extending a project or solution (either by subclassing or adding properties), you’ll need to provide configuration panels so the user can browse and set the new information. This is what you have to do:
Create an ItemOptionsPanel subclass
You’ll need to implement, at least:
- CreatePanelWidget(): Called to create the widget to be shown in the panel.
- ValidateChanges(): Called when the user clicks on OK (Optional).
- ApplyChanges(): Called after all panels have been validated.
There are several properties in ItemOptionsPanel you can use to access to the configured project or solution: ConfiguredSolutionItem, ConfiguredProject, ConfiguredWorkspaceItem and ConfiguredSolution.
Here is a simple example:
public class SimplePanel: ItemOptionsPanel
{
    Gtk.Entry entry;

    public override Widget CreatePanelWidget (
    {
        // Create the widget and initialize it
        entry = new Gtk.Entry ();
        entry.ShowAll ();
        entry.Text = ConfiguredProject.Name;
        return entry;
    }

    public override bool ValidateChanges()
    {
        // Don't allow empty project names
        return entry.Text.Length > 0;
    }

    public override void ApplyChanges()
    {
        // Save the changes
        ConfiguredProject.Name = entry.Text;
    }
}
Create an options panel with support for multiple configurations
Some properties of a project can be set specifically for some configurations (e.g. Debug, Release).
The class MultiConfigItemOptionsPanel is a subclass of ItemOptionsPanel and allows creating option panels which can be used to set configuration specific properties.
What’s special about this option panel is that it shows a combo box which allows selecting the configuration for which the properties will be shown/changed.
This panel also support “mixed configuration editing”, that is, editing several configurations at once (for example, if you want to set the same property value for all configurations). Mixed editing is optional and disabled by default. It can be enabled by setting AllowMixedConfigurations=true.
When mixed editing is disabled, an MultiConfigItemOptionsPanel subclass can access to the current selected configuration using the CurrentConfiguration property. The method LoadConfigData is called every time the current configuration changes. ValidateChanges is called before changing the active configuration.
When mixed editing is enabled, the CurrentConfigurations property returns an array of all selected configurations. The panel implementation is in charge of merging the properties, showing them in the panel widget, and unmerging them when applying changes.
Register the new panel
New configuration panels are registered using the <DialogPanel> element. For example:
<DialogPanel id = "SteticOptionsPanel"
             _label = "Widget Export"
             class = "MonoDevelop.GtkCore.Dialogs.WidgetBuilderOptionPanel"/>
All panels are registered in the same extension point: /MonoDevelop/ProjectModel/Gui/ItemOptionPanels. MonoDevelop defines several standard sections for the options dialog, and custom panels will usually be added to one of those, which are:
- /MonoDevelop/ProjectModel/Gui/ItemOptionPanels/Build: Build settings, such as compiler options.
- /MonoDevelop/ProjectModel/Gui/ItemOptionPanels/Run: Execution settings.
- /MonoDevelop/ProjectModel/Gui/ItemOptionPanels/SourceCode: Source code editing related settings.
- /MonoDevelop/ProjectModel/Gui/ItemOptionPanels/Deployment: Deployment related settings.
- /MonoDevelop/ProjectModel/Gui/ItemOptionPanels/Common: Global properties not directly related to any of the previous operations.
However, in general panels are specific to some types of items. For example, a panel for setting project properties should be shown only for projects, and not for solutions. The type of item can be selected by using conditions:
<Extension path = "/MonoDevelop/ProjectModel/Gui/ItemOptionPanels/Build">
    <Condition id="ItemType" value="Project"
        <DialogPanel id = "SomeProjectPanel"
                     _label = "Some Settings"
                     class = "MyAddin.SomeSettings"/>
    </Condition>
</Extension>
It is also possible to filter by language name, for example:
<Extension path = "/MonoDevelop/ProjectModel/Gui/ItemOptionPanels/Build/Compiler">
    <Condition id="ActiveLanguage" value="C#">
        <Panel id = "CSharpCodeGenerationPanel"
                     _label = "Compiler"
                     class = "CSharpBinding.CodeGenerationPanel"/>
    </Condition>
</Extension>
The <Condition> element is used in this case to make the panel visible only for C# projects.