Creating A Simple Solution
Introduction
The purpose of this tutorial is to outline the basic process for creating an application with MonoDevelop, and also provide some tips for getting started. Our example for this tutorial will be a simple console application which references a separate library.
Terminology
- Solution: a group of MonoDevelop Projects. This information is stored in an xml formatted file with the extension ‘.mds’ in your solution directory. Note: a Solution can contain Solutions.
- Project: a buildable target. Either a library or an executable. It is comprised of source code files, references to libraries, and resource files (such as images). This information is stored in an xml formatted file with the extension ‘.mdp’ in your solution directory.
Step 1: Create the Solution
From the File menu, select “New Solution”, this will open up the “New Solution” window. Select “C#” from the language list and “Console Project” from the templates. Give your application a name as so:
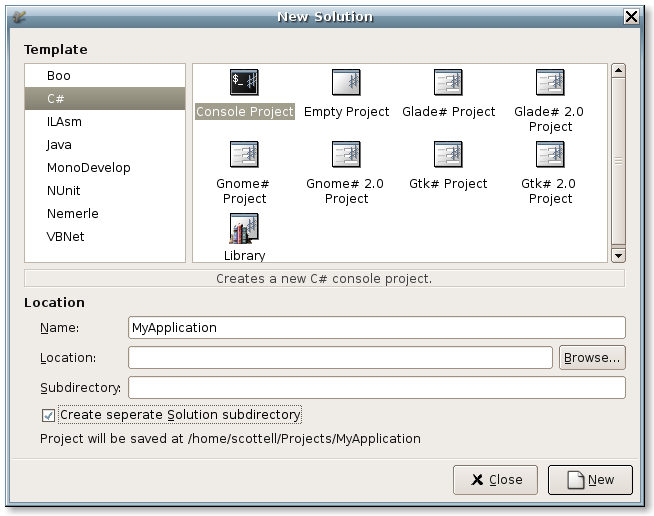
When you are finished, click the “New” button. This creates a new directory for your solution in the Projects directory of your home directory. The “Console Project” template provides an already buildable application. You can test by selecting “Run” from the “Run” menu. This will build the application, and provide the output in an “Application Output” tab.
Step 2: Create A Library Project
For our sample application, we do not want to include all of our functionality in the executable, so we want to create a library. To do this, right click on the Solution icon in the Solution Pad. Select “Add->Add New Project”. From the “New Solution” window, select “C#” as the language and “Library” as the template. Name it “MyLibrary” and click “New”. This will create a new project within your solution.
Now your solution has a new library with one class “MyClass” which initially does absolutely nothing.
Step 3: Using the new library
Setting the Startup Project
Now we have two projects in our solution: an executable and a library. A solution can have multiple executable projects. You can specify the startup project (i.e. the project which is built and run when using the “Run” command) by right clicking on the Solution icon in the Solution pad and choosing “Options”, then Common->Startup Properties. From there you can select single or multiple projects:
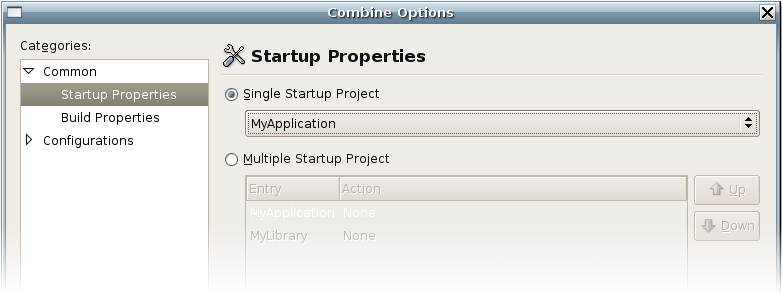
A solution with multiple projects will build and execute all of them in the order you specify. However, we want to set our startup application to “MyApplication” because this is the executable that we want to run.
Referencing our Library
If we are going to be able to use our new library, MonoDevelop needs to know this. We do this by adding a reference to it. From the Solution Pad, expand the node for our project “MyApplication”, this will reveal a References node among others. Right click this and select “Edit References”. This will bring up the References dialog. Select the “Project” tab. Our library should appear in the list, and we can check it as so:
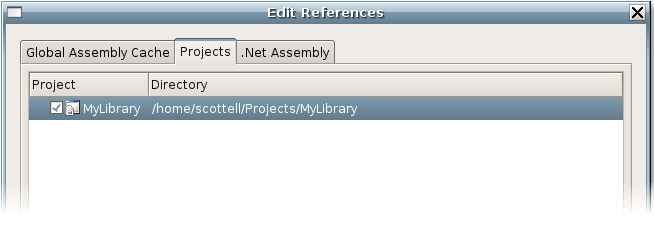
Click “Ok”. Now we have all the classes in our library “MyLibrary” available to our application (exactly one). Let’s test this by creating an instance of the class “MyClass”. Add the following to MyApplication->Main.cs:
// project created on 01/19/2006 at 14:19
using System;
using MyLibrary;
class MainClass
{
    public static void Main(string[] args)
    {
        MyClass test = new MyClass ();

        Console.WriteLine("Hello {0}", test);
    }
}
Our Library in Action
Finally, we can build and run our application, which should produce the following output:
Hello MyLibrary.MyClass
Conclusions
While this output is not particularly impressive, hopefully this tutorial has helped you to grasp the basics of MonoDevelop, and perhaps given you some starting points on how to set up and begin developing your applications.
Others Tips
Building from the Command Line
As of MonoDevelop version 0.9, it is possible to build your solution from the command line. Using the above example, we could do:
mdtool build --f --buildfile:MyApplication/MyApplication.mds
Which will produce:
MyApplication/MyApplication.mds
MonoDevelop Build Tool
Loading combine: /home/scottell/Projects/MyApplication/MyApplication.mds
   Loading project: /home/scottell/Projects/MyApplication/MyApplication.mdp
   Loading project: /home/scottell/Projects/MyLibrary/MyLibrary.mdp
Building Solution MyApplication
   Building Project: MyLibrary Configuration: Debug
      Performing main compilation...
      Build complete -- 0 errors, 0 warnings
   Building Project: MyApplication Configuration: Debug
      Performing main compilation...
      Build complete -- 0 errors, 0 warnings
As of MonoDevelop version 6, it is being distributed as a FlatPak archive. Thus the correct command line to build a Solution, provided you are in the directory of the solution, would be:
flatpak run --command=/app/bin/xbuild com.xamarin.MonoDevelop
if you want to specify which Configuration (Debug or Release, or others if configured) is to be built, you can specify the /p:Configuration command line switch like this:
flatpak run --command=/app/bin/xbuild com.xamarin.MonoDevelop /p:Configuration=Release
For further information, run xbuild with the /help command line option.