Stetic GUI Designer
Introduction
This document is meant as an introductory tutorial to Stetic, the GUI development tool of the MonoDevelop IDE. As part of the tutorial, we will be constructing a simple program for viewing log files. We’ll be using the widgets contained in the Gtk# library. This tutorial will demonstrate how to create the layout of the GUI, including the menu, and how to link this GUI to the underlying software.
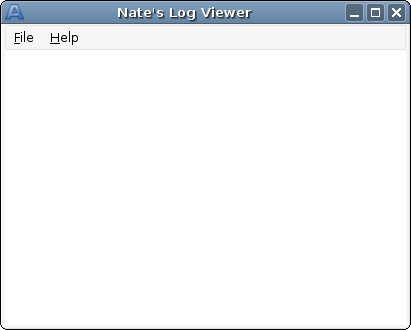
Nate’s Log Viewer
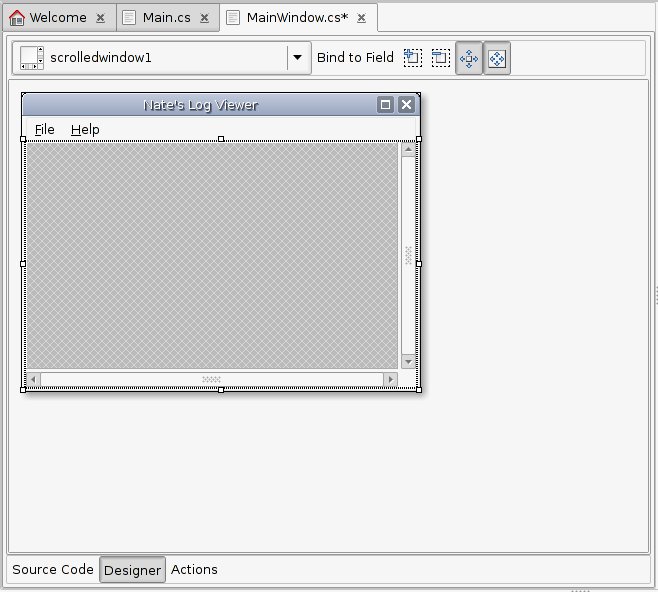
The example program we’ll be making is a simple viewer for text-encoded log files. It won’t have many bells and whistles, but what we’re really interested in is using Stetic anyway. Here’s a picture of what the GUI looks like.
Step 1: Creating a new Project
Open Monodevelop and then select File -> New Project from the menu. It should open a window that looks something like this.
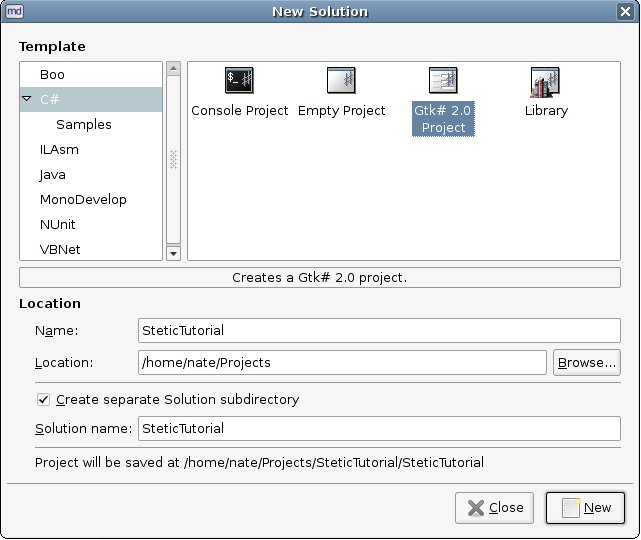
Select C# from the menu on the left and then click the icon labeled Gtk# 2.0 Project. In the entry labeled Name, put the name of the project, make sure that the Create separate Solution subdirectory checkbox is checked (for cleanliness) and then click the New button at the bottom of the window.

As you can see, MonoDevelop has created a skeleton solution and project for us and even opened the file containing the Main class and Main() method for us in the editor window. Nice. We could build and run the application now, lets do that just for fun. Click the Project -> Run menu option, hit F5, or click the Run toolbar button shown below.

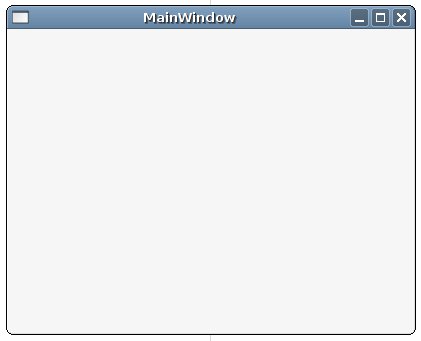
This function saves and builds the project and then runs the resulting executable. You should see something like this.
Exciting, ya? Anyway, click the X in the top right-hand corner to close the application and let’s get started on the GUI.
Step 2: Editing the GUI
First we need to open the MainWindow.cs file. In the solution pad, double-click on the MainWindow.cs file. This creates a new tab in the editor window and loads the file for editing. You’ll notice that a couple of things about the interface change a little.

First off, there are new buttons below the MainWindow.cs tab. Second, two new pads appeared: the Widget Palette pad and the Widget Properties pad.
The new buttons switch the view from the Source Code editor to the GUI designer. Click the Designer button to bring up the Stetic GUI designer.

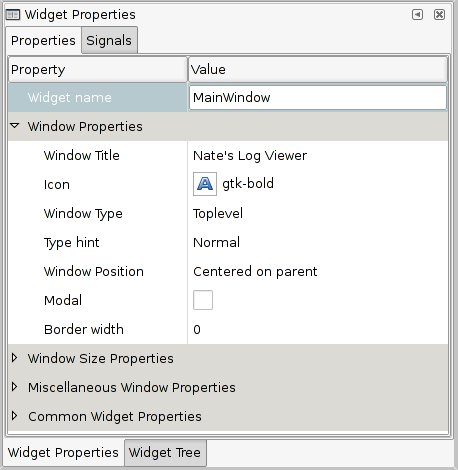
And there’s our GUI, just a simple blank window with buttons and a title. Let’s change window’s title to something more appropriate. To do that, select the window by clicking on it, selecting it from the pull-down menu at the top of the Stetic window or selecting it from the Widget Tree tab of the Widget Properties pad.
Now that its selected, turn your attention to the Widget Properties tab of the Widget Properties pad.
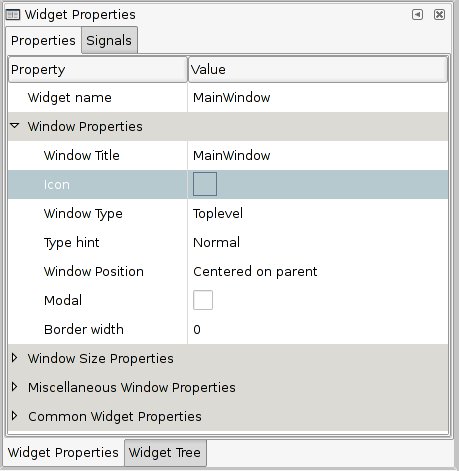
The entries here represent all of the configurable properties of each widget in your application. Let’s change the “Window Title” and “Icon” properties of our nascent application. One property to take note of is the “Sensitive” property. You’ll find it under “Common Widget Properties”. This is what determines if the widget is greyed-out or not. Checked = true = not-greyed-out.
Click the box to the right of “Window Title” and it will change into an editable field. Change the “MainWindow” text to read “Nate’s Log Viewer” or whatever else you want to call it.
Click the box to the right of Icon and then click the … button that appears. Select “gtk-bold” from the icons and then click OK.
Now our application has an appropriate title and icon. How wonderful. Now we need to add a menu and a widget to display the log file contents.
Step 2a: Creating the menus
Creating the menus using Stetic is rather simple. It a matter of dragging, dropping, clicking and renaming. Ok, its a little more complicated than that, but not much. First off, though, we need a container.
Every widget in the Gtk library needs to be within some type of container. The containers control the layout of the widgets on the parent window. In fact, a window itself is a type of container. A widget will fill the container it is placed in. For example, try dragging a button onto the main window widget. You’ll see the following:
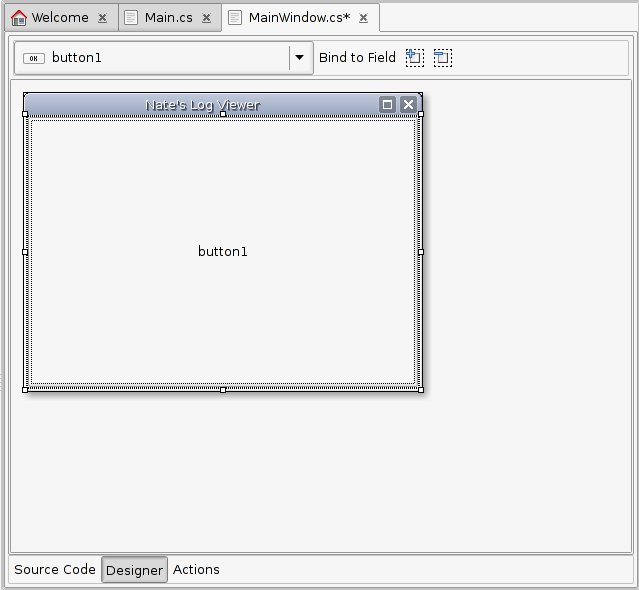
See how the button fills the whole window? That’s what I was talking about. So in order for our window to have any kind of use, we’re going to need to subdivide it with some other containers. These containers take the form of Alignments, Expanders, Frames, HBoxes, HButtonBoxes, HPaneds, Notebooks, Scrolled Windows, Tables, VBoxes, VButtonBoxes, and VPaneds. Each one has a different use and by combining them with the widgets, you can make any type of GUI you might need. Even if you can’t find a widget-container combination that fits your needs, you can always make a custom widget to do the job.
For now, let’s delete the button and start laying out our GUI. Right-click on button1 and select Delete.
Thinking about the layout of our proposed GUI, we have two main areas divided horizontally. A menu area at the top of the window and an area to view log files below that. Sounds like a job for a Vbox.
Drag and drop a Vbox in to the MainWindow.
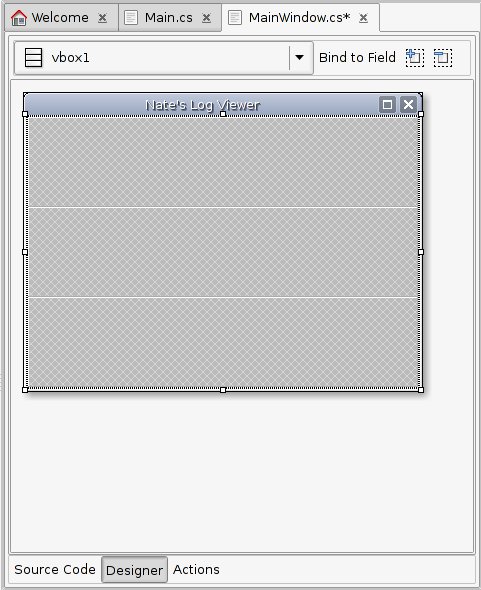
Now the MainWindow is divided into three containers stacked on top of one another. We only need two, though, so right-click on one of them and select Delete. Then drag a Menu Bar widget into the top container.
Now here’s something you might not have expected. Why did the Menu Bar not fill the entire top half of the window? Well, that’s because some widgets have default sizes. Menu Bars are supposed to be confined to the top of the window, so that’s what they do. There are a couple of things that you can do to change this though. One of them is changing the VBox’s Homogenous property. Setting this to true forces the VBox to make each of it’s contained widgets the same size. Try it out.
Another thing you can do is change the Menu Bar’s “Auto Size” property (under Box Child Layout in the Widget Properties pad) to false and then enable the “Expand” and/or “Expand”+”Fill” properties. Expand tells the widget to stay its default size, but center itself in the container and fill the rest of the container with background. Fill tells the widget to fill the container with itself. To explore the difference between the two states, try putting a Button in the bottom half of the VBox and alternating Expand and Expand+Fill. Then delete the button.
On with the Menu Bar. Select the Menu Bar from the Widget Tree (or the pull-down menu at the top of the menu designer window or just click on it in the GUI designer) and then left-click on the text that says “Click to create menu.”
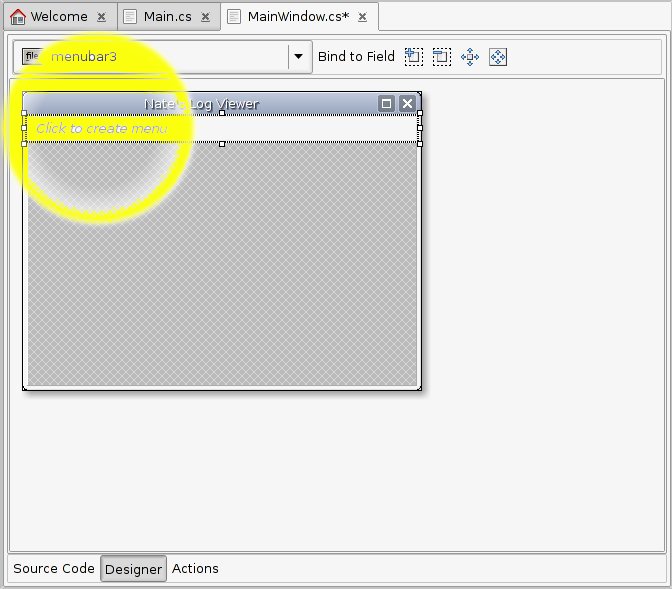
Type “File” in to the entry that appears and then press enter. We have just put the first item into our menu. Notice now that the “File” item is outlined and a sub-menu is visible. We can add items to the file menu as well. We’ll do that later. Right now, let’s add some features to the “File” menu entry.
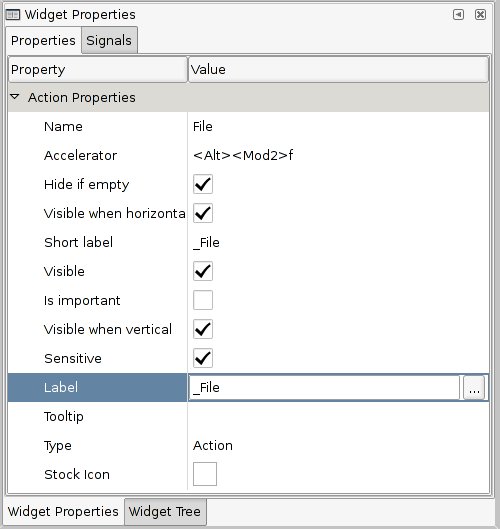
Look back to the Widget Properties pad. Change the Label property to “_File” and then click the “Accelerator” property and hit <alt>+F on your keyboard. This changes the label on the menu entry to read “File” and makes the <alt>+F keyboard combination open this menu when our program has focus. When you’re done, the Widget Properties pad should look like this:
Let’s add “Open”, “Close”, and “Exit” actions to our “File” sub-menu now. To add the first one, click on the sub-menu below the “File” and an entry will appear. Type “Open” into the entry just like we did with “File” and then hit enter. In the Widget Properties pad, change its “Label” to “_Open” and set its accelerator to <ctrl>+O. Do the same for “Close” with “C_lose” and <ctrl>+L and “Exit” with “E_xit” and <ctrl>+X.
Next to the “File” entry, we’ll create a “Help” entry with an “About” entry in its sub-menu. As a shortcut, you can just type “_Help” into the entry that appears when you click the “Click to create menu” in the GUI designer. Don’t forget to set its accelerator to <ctrl>+H.
One interesting thing to note, before we continue, is that if we press the Actions button at the bottom of the GUI designer window, we can see all of the menu items we just created.
We could have also created all of our menu items (called Actions) from here. Notice also in the Widget Palette pad, that the Actions we just created appeared down at the bottom. We could also have drag-and-dropped them in to the menu in the right layout. Pretty convenient.

All right! Let’s build and run our application now and have a look at the menus we just created. Click the Run button and have a look. You might be disappointed to find that none of the menu entries do anything. This is because we have to connect them to a signal handler and then write their code.
To do this, we need to use the Signals tab of the Widget Properties pad. For simplicity, we’ll use the Actions display brought up by pressing the Actions button at the bottom of the GUI designer. Select the “Openâ€? action and then click the Signals tab in the Widget Properties pad. Here we can see a list of the signals to which we can attach handlers for this widget.
In fact there are three: “Activated”, “Changed”, and “Toggled”. For our program we want “Activated”.
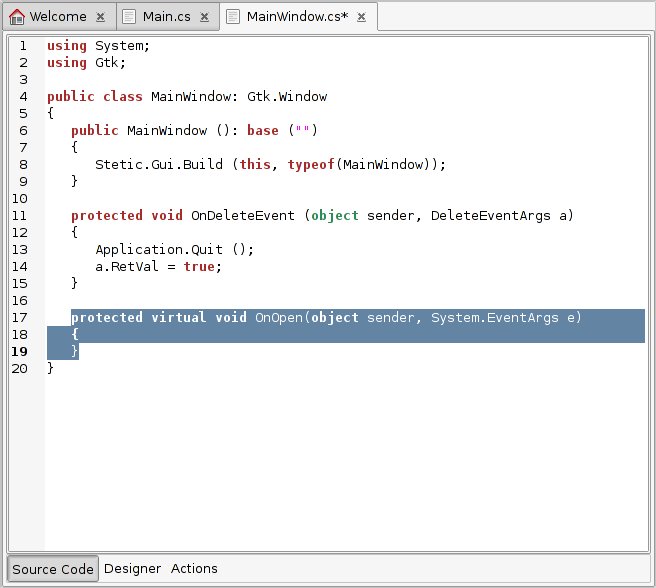
Click on the “Click here to add a new handler” next to the “Activated” signal and type “OnOpen” into the entry and press enter. As such:

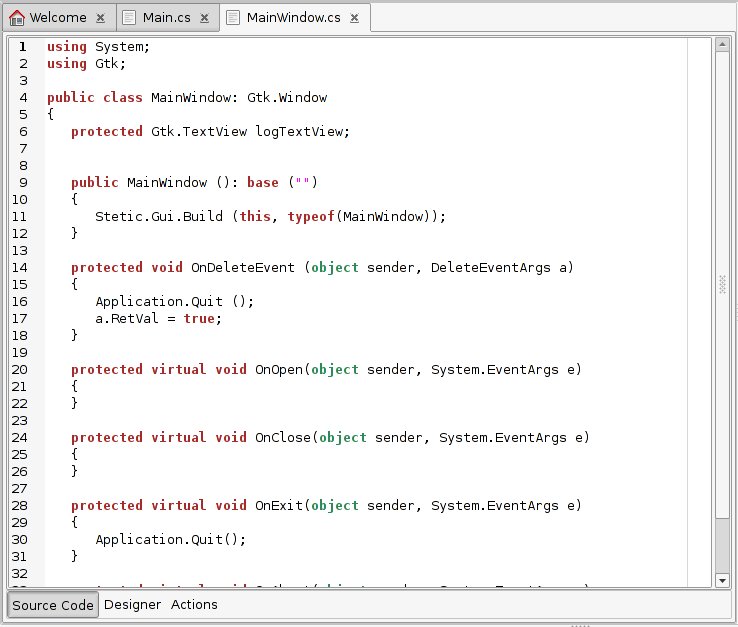
Now, if you click the Source Code button at the bottom of the GUI designer and notice that MonoDevelop has automatically added a skeleton “OnOpen” function to our MainWindow class. This is the function that will be called when the “Open” menu item is activated.
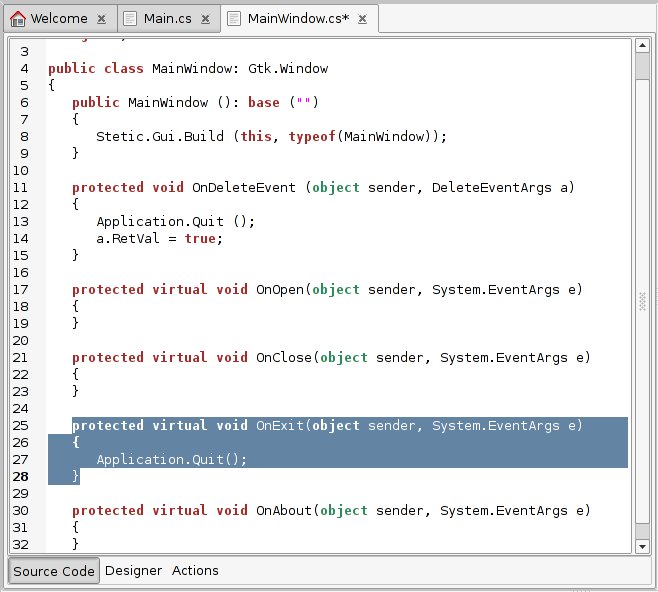
Now add the signal handlers “OnClose”, “OnExit”, and “OnAbout” to the “Close”, “Exit”, and “About” menu items, respectively. When you’re done, click back over to the Source Code window and we’ll add some code to the “OnExit” function.
Add the command “Application.Quit(); to the “OnExit” function so that it looks like this.
Now if you compile and run the application, you’ll find that the “Exit” menu entry and <ctrl>+X key combination work. Good deal.
We’ll add the code for the other signal handlers later. Right now let’s put the rest of the GUI together.
Step 2b: Creating the TextView
In the bottom half of our MainWindow, we’ll put a TextView widget inside of a Scrolled Window container to display the log files with.
To start out, drag and drop a Scrolled Window widget from the Widget Palette onto the bottom half of the VBox in the MainWindow.
Then drag and drop a TextView widget into the blank space left in the Scrolled Window. Change its “Name” property in the Properties tab of the Widget Properties pad to “logTextView”. Like this:

MonoDevelop creates a field for every widget in the window. You can use that field to access to the widget properties at run time.
This field is not created in the window class being implemented, but in a different hidden file. That’s why the class has the ‘partial’ modifier, which allows splitting a class in several files.
We should uncheck the “Cursor Visible” and “Editable” properties for the logTextView, although its not critical to do so.
Great! We have all the pieces of our GUI in place. Lets get to the coding.
Step 3: Writing the Code
Click over to the Source Code of MainWindow.cs and have a look.
In order to complete our program, we need to add the underlying code to make it work. Since this isn’t a tutorial on C#, I’ll just quote the necessary code here and you can copy and paste it into your program.
For the OnOpen method:
protected virtual void OnOpen(object sender, System.EventArgs e)
{
   // Reset the logTreeView and change the window back to original size
   int width, height;
   this.GetDefaultSize( out width, out height );
   this.Resize( width, height );

   logTextView.Buffer.Text = "";

   // Create and display a fileChooserDialog
   FileChooserDialog chooser = new FileChooserDialog(
      "Please select a logfile to view ...",
      this,
      FileChooserAction.Open,
      "Cancel", ResponseType.Cancel,
      "Open", ResponseType.Accept );

   if( chooser.Run() == ( int )ResponseType.Accept )
   {
      // Open the file for reading.
      System.IO.StreamReader file =
      System.IO.File.OpenText( chooser.Filename );

      // Copy the contents into the logTextView
      logTextView.Buffer.Text = file.ReadToEnd();

      // Set the MainWindow Title to the filename.
      this.Title = "Nate's Log Viewer -- " + chooser.Filename.ToString();

      // Make the MainWindow bigger to accomodate the text in the logTextView
      this.Resize( 640, 480 );

      // Close the file so as to not leave a mess.
      file.Close();
   } // end if
   chooser.Destroy();
} // end method OnOpen
For the OnClose method:
protected virtual void OnClose(object sender, System.EventArgs e)
{
   // Reset the logTreeView and change the window back to original size
   int width, height;
   this.GetDefaultSize( out width, out height );
   this.Resize( width, height );

   logTextView.Buffer.Text = "";

   // Change the MainWindow Title back to the default.
   this.Title = "Nate's Log Viewer";
} // end method OnClose
For the OnAbout method:
protected virtual void OnAbout(object sender, System.EventArgs e)
{
   // Create a new About dialog
   AboutDialog about = new AboutDialog();

   // Change the Dialog's properties to the appropriate values.
   about.Name = "Nate's Log Viewer";
   about.Version = "1.0.0";

   // Show the Dialog and pass it control
   about.Run();

   // Destroy the dialog
   about.Destroy();
} // end method OnAbout
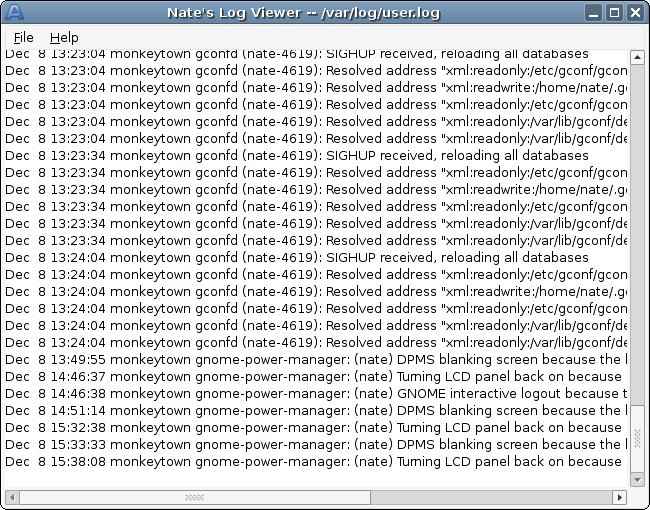
Once that’s all in the right places, just click the Run button and read logs to your heart’s content. Here’s a shot of the final product in action:
TODO
- Upload complete project source and compiled binary in bz2 format.